Fusion Welding Processes
INTRODUCTION
The welding processes described in this chapter involve partial melting and fusion of the joint between two members. Here, fusion welding is defined as melting together and coalescing materials by means of heat. The thermal energy required for these welding operations is usually supplied by chemical or electrical means. Filler metals, which are metals added to the weld area during welding of the joint, may or may not be used. Fusion welds made without the addition of filler metals are known as autogenous welds.
This chapter describes major classes of fusion welding processes, presenting the basic principles of each welding process and the equipment used, their relative advantages, limitations, process capabilities, and economic considerations in their selection. These processes include oxyfuel, arc, Thermit, and high-energy beams; the latter usually consists of electron-beam and laser-beam welding processes which have important and unique applications in modern manufacturing.
OXYFUEL GAS WELDING
Oxyfuel gas welding (OFW) is a general term used to describe any welding process that uses a fuel gas combined with oxygen to produce a flame. This flame is used as the source of heat to melt the metals at the joint. The most common gas welding process uses acetylene fuel, and is known as oxyacetylene welding and is used typically for structural sheet-metal fabrication and automotive bodies and various other repair work. Developed in the early 1900s, this process utilizes the heat generated by the combustion of acetylene gas (C2H2) in a mixture with oxygen.
The heat is generated in accordance with the following chemical reactions. The primary combustion process, which occurs in the inner core of the flame is
C2H2 + O2 ® 2CO + H2 + heat. (1)
This reaction dissociates the acetylene into carbon monoxide and hydrogen and produces about one-third of the total heat generated in the flame. The second reaction is
2CO + H2 + 1.5O2 ® 2CO2 + H2O + heat, (2)
which results in burning of the hydrogen and combustion of the carbon monoxide, producing about two-thirds of the total heat. The temperatures developed in the flame as a result of these reactions can reach 3300ºC (6000ºF). The reaction of hydrogen with oxygen produces water vapor.
Types of flames
The proportions of acetylene and oxygen in the gas mixture are an important factor in oxyfuel gas welding. At a ratio of 1:1, that is, when there is no excess oxygen, it is considered to be a neutral flame. With a greater oxygen supply, it becomes an oxidizing flame. This flame is harmful, especially for steels, because it oxidizes the steel. Only in copper and copper-base alloys is an oxidizing flame desirable because a thin protective layer of slag forms over the molten metal. If the supply of oxygen is lowered, it becomes a reducing or carburizing flame. The temperature of a reducing, or excess-acetylene, flame is lower. Hence it is suitable for applications requiring low heat, such as brazing, soldering, and flame hardening.
Other fuel gases such as hydrogen and methylacetylene propadiene can be used in oxyfuel gas welding. However, the temperatures developed are low, and hence they are used for welding metals with low melting points, such as lead, and parts that are thin and small. The flame with hydrogen gas is colorless, making it difficult to adjust the flame by eyesight. Other gases, such as natural gases, propane, and butane, are not suitable for oxyfuel welding because of the low heat output or because the flame is oxidizing.
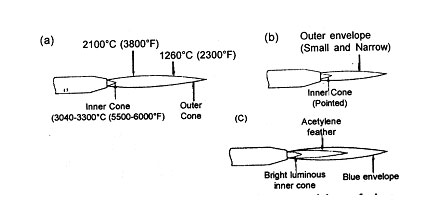
Figure 1. Three types of oxyacetylene flames used in oxyfuel gas welding and cutting operations: (a) neutral flame; (b) oxidizing flame; and (c) carburizing, or reducing, flame. The gas mixture is basically equal volumes of oxygen and acetylene.
Filler metals
Filler metals are used to supply additional material to the weld zone during welding. They are available as rods or wire, and are mad of metals compatible with those to be welded. These consumable filler rods may be bare, or they may be coated with flux. The purpose of the flux is to retard oxidation of the surfaces of the parts being welded, by generating a gaseous shield around the weld zone. The flux also helps dissolve and remove oxides and other substances from the workpiece, resulting in a stronger joint. The slag developed protects the molten puddle of metal against oxidation as it cools.
Welding practice and equipment
Oxyfuel gas welding can be used with most ferrous and nonferrous metals for any thickness of workpiece, but the relatively low heat input limits the process economically to less than 6 mm (0.25 in.). A variety of joints can be produced by this method. The details of welding procedures are given in various texts; the basic steps are summarized as follows:
- Prepare the edges to be joined, and maintain their proper position using suitable clamps and fixtures.
- Open the acetylene valve and ignite the gas at the tip of the torch. Open the oxygen valve and adjust the flame for the particular operation.
- Hold the torch at about 45º from the plane of the workpiece, the the inner flame near the workpiece and the filler rod at about 30º-40º.
- Touch the filler rod to the joint and control its movement along the joint length by observing the rate of melting and filling of the joint.
Small joints may consist of a single weld bead, as shown in Fig. V.4. Deep V groove joints are made in multiple passes. Cleaning the surface of each weld bead prior to depositing a second layer is important for joint strength and avoiding defects. Hand or power wire brushes may be used for this purpose.
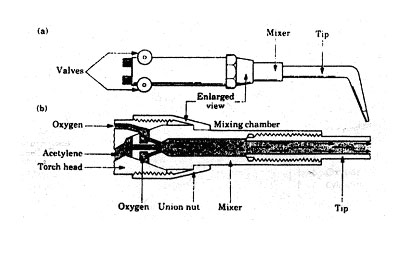
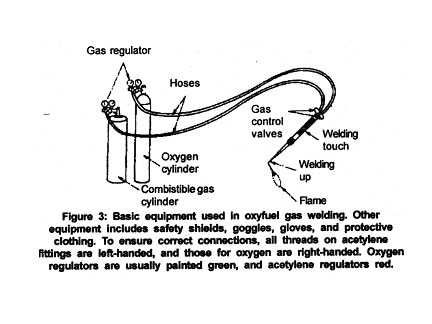
The equipment for oxyfuel gas welding basically consists of a welding torch, which is available in various sizes and shapes, connected by hoses to high-pressure gas cylinders and equipped with pressure goges and regulators. The use of safety equipment such as goggles with shaded lenses, face shields, gloves, and protective clothing is important. Proper connection of hoses to the cylinders is also an important factor in safety. Oxygen and acetylene cylinders have different threads, so hoses cannot be connected to the wrong cylinders. Gas cylinders should be anchored securely and should not be dropped or mishandled.
Process capabilities
The low cost of the equipment, usually less than $500 for smaller units, is an attractive feature of oxyfuel gas welding. Although it can be mechanized, this welding operation is essentially manual and hence slow, and is used typically for fabrication and repair work. It has the advantage of being portable, versatile, and economical for low-quantity and simple work. Proper operator training and skill are essential.
ARC-WELDING PROCESSES: CONSUMABLE ELECTRODE
In arc welding, developed in the mid-1800s, the heat required is obtained through electrical energy. Using either a consumable or nonconsumable electrode (rod or wire), an arc is produced between the tip of the electrode and the workpiece to be welded, using ac or dc power supplies. This arc produces temperatures in the range of 30,000ºC (54,000°F), which is much higher than those developed in oxyfuel gas welding. Arc welding includes various welding processes, which are described below.
Shielded metal-arc welding
Shielded metal-arc welding (SMAW) is one of the oldest, simplest, and most versatile joining processes. Currently, about 50 percent of all industrial and maintenance welding is performed by this process. The electric arc is generated by touching the tip of a coated electrode against the workpiece and then withdrawing it quickly to a distance sufficient to maintain the arc. The electrodes are in the shape of thin, long sticks, so this process is also known as stick welding.
The heat generated melts a portion of the tip of the electrode, its coating, and the base metal in the immediate area of the arc. A weld forms after the molten metal-a mixture of the base metal (workpiece), electrode metal, and substances from the coating on the electrode-solidifies in the weld area. The electrode coating deoxidizes and provides a shielding gas in the weld area to protect it from oxygen in the environment.
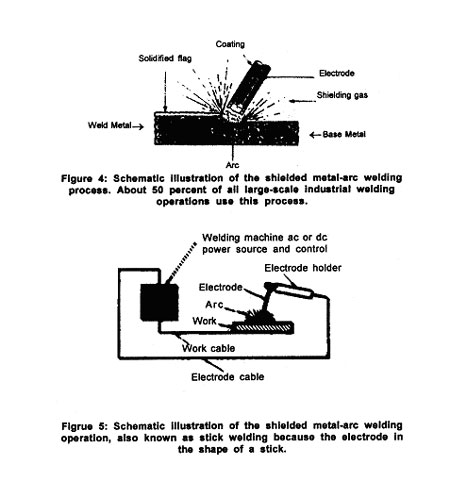
A bare section at the end of the electrode is clamped to one terminal of the power source, while the other terminal is connected to the workpiece being welded. The current usually ranges between 50 A and 300 A, with power requirements generally less than 10kW. The current may be ac or dc, and the polarity of the electrode may be positive (reverse polarity) or negative (straight polarity). The choice depends on the type of electrode, type of metals to be welded, and depth of the heated zone. Too low a current causes incomplete fusion, and too high a current can damage the electrode coating and reduce its effectiveness.
Process capabilities
The SMAW process has the advantage of being relatively simple and versatile, requiring a relatively small variety of electrodes. The equipment consists of a power supply, power cables, and electrode holder, and the total cost of equipment is typically below $1500. The use of safety equipment, similar to that used with oxyfuel gas welding, is essential.
This process is commonly used in general construction, shipbuilding, and pipelines, as well as for maintenance work, since the equipment is portable and can be easily maintained. It is especially useful for work in remote areas where portable fuelpowered generators can be used as the power supply. The SMAW process is best suited for workpiece thicknesses of 3-19 mm (0.12-0.75 in.), although this range can be easily extended using multiple-pass techniques and highly skilled operators. This process requires that slag be cleaned after each weld bead. Unless removed completely, the solidified slag can cause severe corrosion of the weld area and lead to failure of the weld. Slag should also be completely removed, such as by wire brushing, before another weld is applied for multiple-pass welding. Thus labor costs are high, as are material costs.
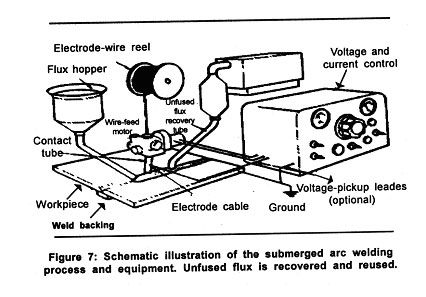
Figure 6: A weld zone showing the buildup sequence of individual weld beads in deep welds.
Submerged arc welding
In submerged arc welding (SAW), the weld arc is shielded by granular flux, consisting of lime, silica, manganese oxide, calcium fluoride, and other elements. The flux is fed into the weld zone by gravity flow through a nozzle. The thick layer of flux completely covers the molten metal and prevents spatter and sparks-and without the intense ultraviolet radiation and fumes of the SMAW process. The flux also acts as a thermal insulator, allowing deep penetration of heat into the workpiece. The welder must wear gloves, but other than tinted safety glasses, face shields generally are unnecessary.
The consumable electrode is a coil of bare round wire 1.5-10 mm (1/16 - 3/8 in.) in diameter, and is fed automatically through a tube (welding gun). Electric currents usually range between 300 A and 2000 A. The power supplies are usually connected to standard single-or three-phase power lines with a primary rating up to 440 V.
Process capabilities
Because the flux is fed by gravity, the SAW process is somewhat limited to welds in a flat or horizontal position with backup piece. Circular welds can be made on pipes, provided that they are rotated during welding. As fig. 7 shows, the unfused flux can be recovered, treated, and reused.
This process is used to weld a variety of carbon and alloy steel and stainless steel sheet or plate, at speeds as high as 5 m/min (16 ft/min). The quality of the weld is very high, with good toughness, ductility, and uniformity of properties. The SAW process provides very high welding productivity, depositing 4-10 times the amount of weld metal per hour as the SMAW process. Typical applications include thick plate welding for shipbuilding and pressure vessels.
Gas metal-arc welding
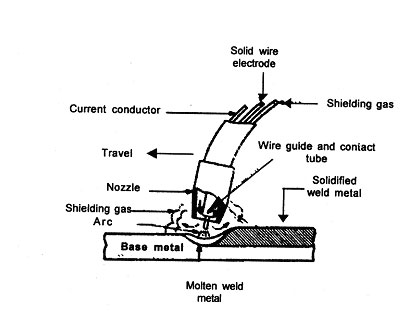
In gas metal-arc welding (GMAW), the weld area is shielded by an external source, such as argon, helium, carbon dioxide, or various other gas mixtures. The consumable bare wire is fed automatically through a nozzle into the weld arc. In addition to the use of inert shielding gases, deoxidizers are usually present in the electrode metal itself, in order to prevent oxidation of the molten weld puddle. Multiple weld layers can be deposited at the joint.
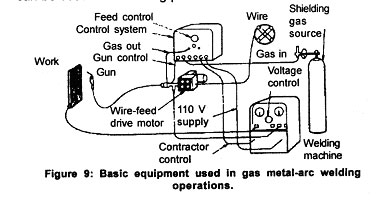
Figure 8: Gas metal-arc welding process, formerly known as MIG (for metal inert gas)
Metal can be transferred three ways in the GMAW process: spray, globular, and short circuiting. In spray transfer, small droplets of molten metal from the electrode are transferred to the weld area at rates of several hundred droplets per second. The transfer is spatter-free and very stable. High dc current and voltages and large-diameter electrodes are used, with argon or argon-rich gas mixtures used as the shielding gas. The average current required in this process can be reduced by pulsed arcs, which are high-amplitude pulses superimposed over a low, steady current, and the process can be used in all welding positions.
In globular transfer, carbon-dioxide rich gases are utilized, and globules propelled by the forces of the electric arc transfer the metal, resulting in considerable spatter. High welding currents are used, with greater weld penetration and welding speed than in spray transfer. Heavier sections are commonly joined by this method.
In short circuiting, the metal is transferred in individual droplets, at rates of more than 50 per second, as the electrode tip touches the molten weld metal and short circuits. Low currents and voltages are utilized, with carbon-dioxide rich gases and electrodes made of small-diameter wire. The power required is about 2kW. The temperatures involved are relatively low. Thus this method is suitable only for thin sheets and sections (less than 6 mm; 0.25 in.); otherwise, incomplete fusion may occur. This process is very easy to use and may be the most popular for welding ferrous metals in thin sections. However, pulsed-arc systems are gaining wide usage for thin ferrous and nonferrous metals.
Process capabilities
The GMAW process was developed in the 1950s and was formerly called metal inert-gas (MIG) welding. It is suitable for welding a variety of ferrous and nonferrous metals and is used extensively in the metal-fabrication industry. Because of the relatively simple nature of the process, training operators is easy. This process is rapid, versatile, and economical; welding productivity is double that of the SMAW process. The GMAW process can easily be automated and lends itself readily to robotics and flexible manufacturing systems.
Width Change by Rolling and Pressing
METHODS OF WIDTH CHANGE BY ROLLING
Width reduction can be accomplished by the rolling mills having two types of roll arrangements:
- horizontal roll arrangement
- vertical roll arrangement.
When a slab is rolled from an ingot, the desired width is usually obtained by rolling the slab on its edge in a slabbing mill having horizontal rolls.
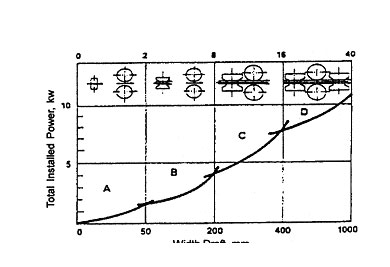
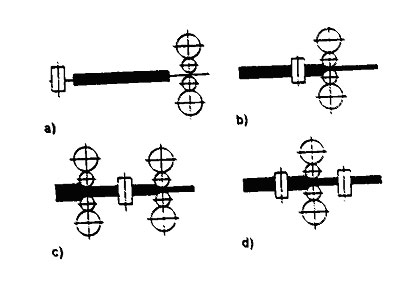
Fig. 1: Main arrangements of vertical and horizontal mills: a) open mill stand, b) VH, c) HVH, and d) VHV.
The majority of slabs are presently reduced in width by rolling mills having vertical rolls. The vertical mill stands that are used for this reduction of width of a workpiece are conventionally called vertical edgers. The vertical edgers that are immediately installed after the reheating furnaces are known as vertical scalebreakers because of their ability to enhance the breaking of scale during the squeezing of a slab.
The edging process conducted on vertical mill stands is usually combined with a flat rolling process that is implemented in horizontal mill stands. The following main arrangements of vertical (V) and horizontal (H) mill stands are known:
- Open mill stand arrangement which allows for a free bar to be rolled by the edger.
- VH arrangement, in which a vertical edger is close-coupled with a horizontal mill stand.
- HVH arrangement, in which a vertical edger is installed between two close-coupled horizontal mill stands.
- VHV arrangement, in which a horizontal mill stand is installed between two close-coupled vertical edgers.
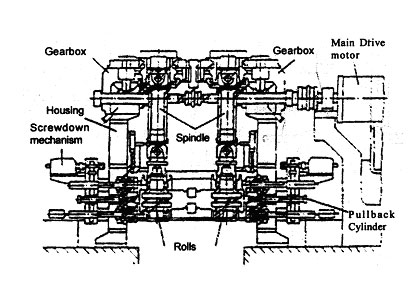
Fig. 2: Edging capability of various mill arrangements.
The VHV arrangements, which incorporate two vertical edgers close-coupled with one or more horizontal mills are also known as slab sizing mills. The edging capabilities of various mill arrangements are shown in Fig. 2.
Vertical Edgers
Vertical edgers can be divided into the following groups depending on their main drive arrangement:
- Bottom-driven vertical edgers
- Top-driven vertical edgers.
The bottom-driven vertical edgers take a minimum amount of space above the mill pass line, providing a convenient method for roll changing. However, the maintenance of the main drive system, which is located below the pass line, presents a significant problem.
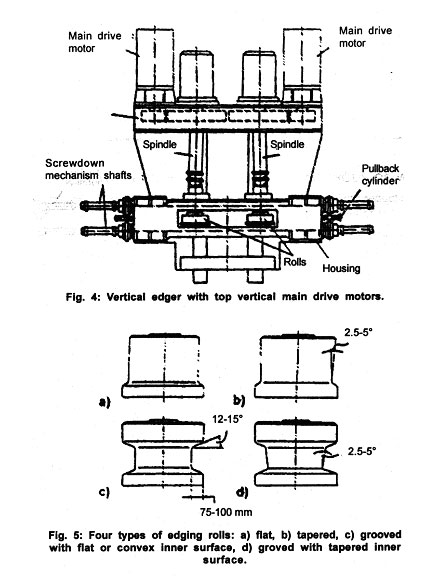
Fig. 3: Vertical edger with top horizontal main drive motors.
Top-driven vertical edgers can be of the following designs:
- With a horizontal main driven motor and
- With two vertical main drive motors
The arrangement having a horizontal main drive motor has a lower height in comparison with the edger arrangement having two vertical main drive motors. There is, however, an advantage in using the vertical main drive motors since more reliable cylindrical gears can be used rather than the less reliable bevel gears that are used in the edgers with horizontal main drive motors.
The four principal shapes of edging rolls that are used in vertical edgers are:
- Flat rolls
- Tapered rolls
- Grooved rolls with flat or convex inner surface
- Grooved rolls with tapered inner surface.
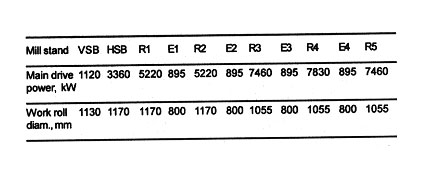
Flat rolls require a minimum amount of energy for edging. However, the edging efficiency with flat rolls is low, and also one side of the slab has a tendency to rise when edging. With tapered rolls, the probability for this type of instability of the edging process is significantly reduced. Edging with grooved rolls increases the edging efficiency by pushing the peak of the dog bone closer to the centerline of the slab. Grooved rolls, however, are only effective when the slab thickness is compatible with the groove height. To provide stability of the slab when the slab thickness is less than the groove height, these rolls can be designed with a tapered inner surface.
EXAMPLES OF EDGING PRACTICE
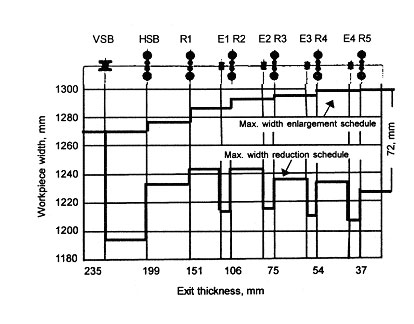
Figure 6 illustrates an example of the application of vertical edgers in a typical continuous hot strip mill. A stand-alone vertical scalebreaker, VSB is located downstream from the reheat furnaces. This scalebreaker is usually the most powerful edging stand in the mill, producing a major reduction in width. The subsequent edgers, E1 through E4 are in a close-coupled arrangement with the downstream roughing mill stands R2 through R5. Their purpose is to maintain the width or to produce a relatively small additional width reduction.
The width change range of the roughing train is defined as the difference between the width produced without edging and the width produced by taking the maximum possible width reduction at each edging stand. In the example shown in Fig. 6, the width change range is equal to 72 mm for a slab with initial width of 1270 mm.
Another example of a rolling practice is shown in Fig. 7 in application to a reversing roughing mill with a close-coupled vertical edger located at the entry side of the roughing mill stand. By using a powerful vertical edger, with grooved rolls, the overall reduction in width of 370 mm is obtained for a slab with an initial width of 1100 mm.
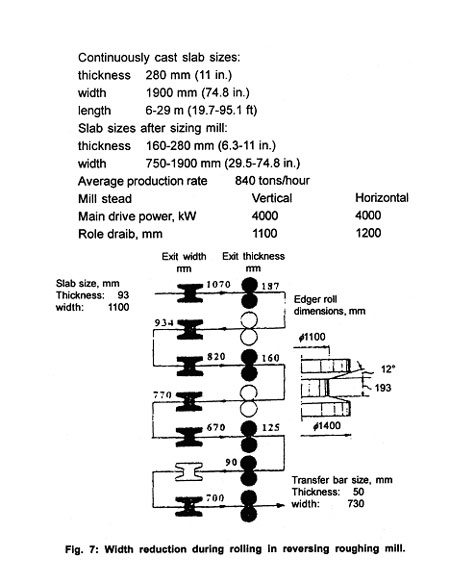
Fig. 6 Width change produced at roughing train of continuous hot strip mill.
SLAB SIZING MILLS
The main purpose of slab sizing mills is to reduce the number of required slab widths produced by a continuous caster. Width change using slab sizing mills is usually performed at the following three principal locations:
- On-line location after the continuous caster
- On-line location in a hot rolling mill
- Off-line location.
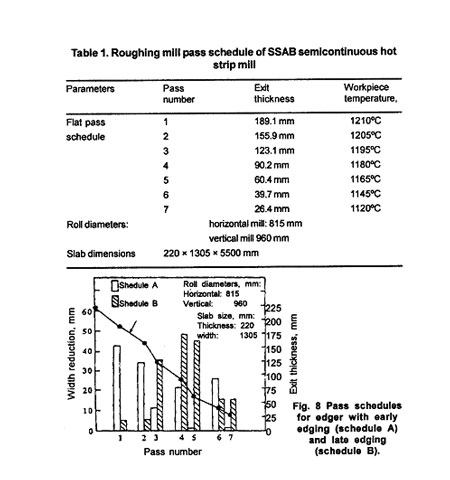
The VHV arrangement is used in the Nippon Steel Oita Works, Japan. This slab sizing mill, which was developed by IHI, Japan, is an off-line reversing mill that provides reduction in both thickness and width and also utilizes grooved rolls in the edger. The principal specifications of this slab sizing mill are:
Number of cast slab widths:
EFFECT OF EDGING PRACTICE ON WORKPIECE END SHAPE
The effect of the edging practice on the transfer bar end shape was investigated by Pera, et al at the SSAB semi-continuous hot strip mill in Sweden. This investigation was performed for the following three different edging practices:
- Edging work is mostly done during the early passes.
- Edging work is mostly done during the late passes.
- Maximum possible edging is done during all passes.
For all these tests, the same thickness reductions were taken as illustrated in Table 1. Figure 8 shows the pass schedules for the vertical edger when edging was done during the early passes which is designated as Schedule A, and during the late passes (Schedule B). These investigations have shown that when the edging work is done early in the schedule, a strong fish tail is created in the slab ends.
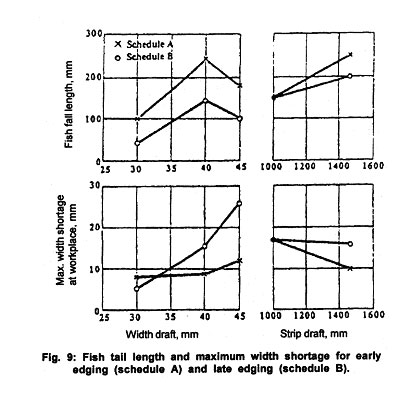
Figure 9 shows that the length of the fish tail increases with the increasing reduction and increasing slab width. Edging late in the schedule is always advantageous with regard to the amount of end scrap. On the other hand, such a procedure may lead to buckling of the slab. Late edging tends to give a more inhomogeneous deformation, concentrated along the side of the slab resulting in increased spread when the dog bone is rolled out in the next flat pass. As the height of the dog bone decreases in the slab ends, the width shortage in the ends is accentuated.
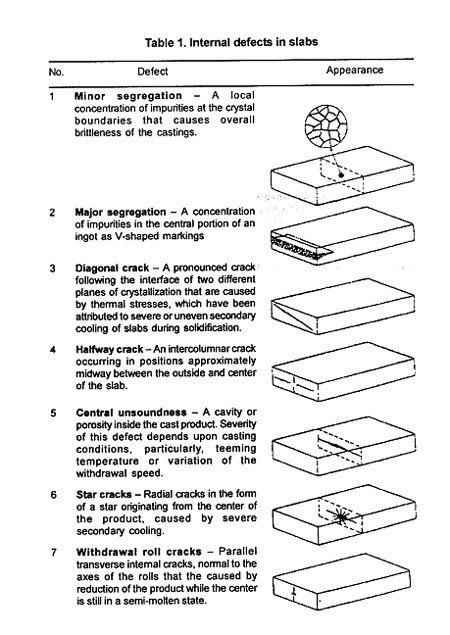
Figure 9 shows the maximum width shortage at the strip ends. This width shortage increases with an increasing reduction and decreased slab width. During these trials, a maximum width reduction of 150 mm was achieved for wide slabs and nearly 100 mm for narrow slabs. The width shortage was as much as 55 mm and the nonuniform length at the bar ends was as long as 20 meters, resulting in crop losses of up to 10%.
EFFECT OF EDGING PRACTICE ON WORKPIECE METALLOGRAPHIC PROPERTIES
The influence of heavy width reduction rolling of continuously cast slabs on the metallographic structure and mechanical properties at the slab edge was studied by Kokado, et al. The results of this study can be summarized as follows:
By repeating vertical and horizontal rolling alternatively, the columnar structure at the slab edge, produced in the slab width direction in the casting process, is destroyed and the mechanical properties are improved.
For the same reduction rate, the smaller the width reduction ratio and the greater the number of rolling passes, the more refined deformation can be obtained at the slab edge. Therefore, the mechanical properties of the rolled material are superior to the ones obtained with a large reduction and fewer passes. However, if the width reduction is small, the slab center is less deformed and therefore the thickness at the center is reduced. This causes an increase in the crop losses at the head and tail ends of the slab, and would be even further increased if an inner crack existed in the center section of the slab.
If horizontal rolling only is performed, without vertical rolling, the direction of the columnar structure at the slab edge does not change, and therefore the mechanical properties do not improve.
Generally, the yield stress and tensile strength of the material rolled by a horizontal mill alone are greater than in the material that is rolled by both horizontal and vertical mills. However, this difference is minimal and the overall properties of the hot rolled steel slabs processed from continuously cast slabs by heavy width-reduction rolling are superior to those processed by horizontal rolling only.
Metallurgical Defects in Cast Slabs and Hot Rolled Products
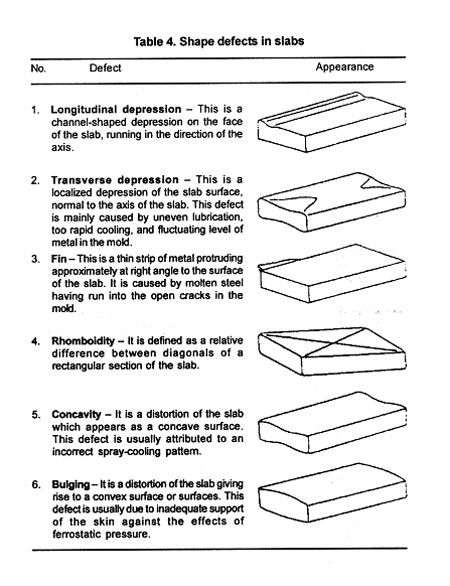
CLASSIFICATION OF DEFECTS IN CAST SLABS
Defects in cast slabs can be divided into the following four main groups as proposed by BISRA:
- Internal defects
- External cracks
- Surface defects
- Shape defects.
Internal Defects in Slabs
The internal defects usually include segregation, non-metallic inclusions, and various types of cracks.
Segregation
Segregation is a concentration of dissolved impurities in that portion of the metal which solidifies last. The dendrites which form are almost pure metal, and therefore the impurities become progressively more concentrated in the remaining liquid.
Non-metallic inclusions
Non-metallic inclusions are the oxidized materials and sulfides in various combinations with each other. They are a result of oxidizing reactions which take place during refining process; they can also be associated with the erosion of ladle or other refractories.
A more detailed definition of internal defects is given in Table 1.
EXTERNAL CRACKS IN SLABS
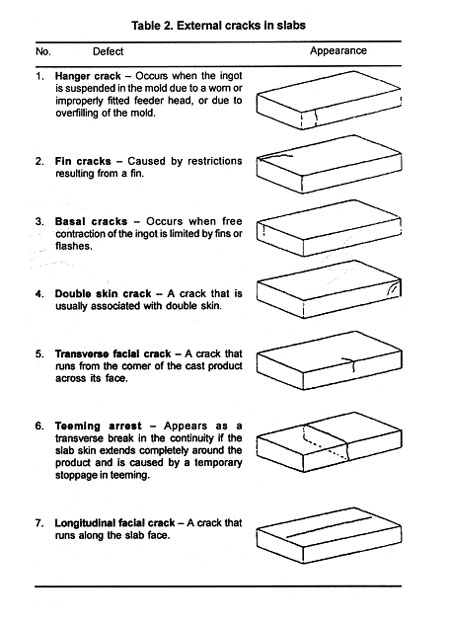
Cracks or ruptures in slabs may be caused by a number of reasons such as the following:
- Restriction to the ingot skin during cooling
- Inability of the skin to withstand the stresses resulting from ferrostatic pressure exerted by the liquid steel:
- A too high teeming temperature
- A too high teeming rate
- A too high mold temperature
- Steel entering the mold towards one side instead of the center.
- Inadequate mold design
- Distortion or wear of the mold
- Fast or uneven cooling in the mold
- Fast or uneven secondary cooling of different faces of the slabs
- Bending or straightening of the slab at a low temperature.
A brief description of the most common types of external cracks in slabs is shown in Table 2. Not included in the table is the slab defect known as hot shortness that is defined below.
Hot shortness - This is a localized cracking normally associated with concentration of copper and tin in the grain boundaries.
Surface Defects in Slabs
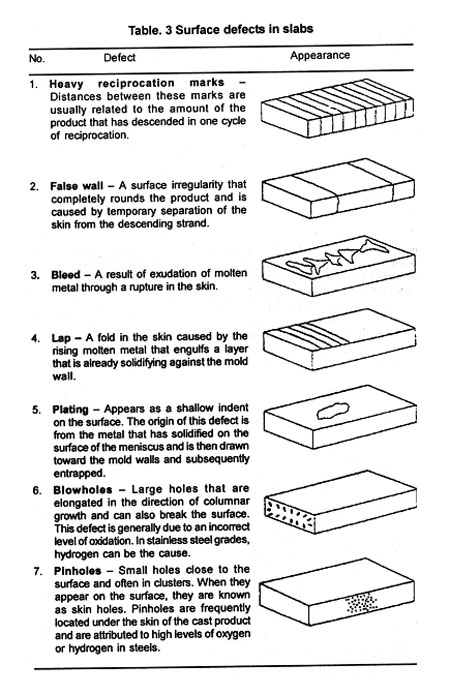
Continuously cast slab may have surface defects which are attributed to the certain specifics of the casting process. The most typical surface defects of this type are listed in Table 3. In addition, the following surface defects may be found in the slabs.
Guide marks - This is a mechanical damage arising from irregularities on the guides, support, bending or straightening rolls. The guide marks can also be caused by extraneous metal adhering to the parts of the guiding mechanism.
Carburization - This is a localized surface pick-up of carbon from oil lubrication. It is encountered especially in the casting of low-carbon stainless-steel grades.
Splash - It is a generally spattered surface caused by small particles of metal trapped between the product skin and mold wall.
Entrapped scum - These are the patches on the ingot or slab surfaces. They are formed by the products of deoxidation or refractory erosion that are trapped at the meniscus.
Bruises - This is a mechanical injury to the ingot or slab skin such as dog marks from the crane or indentations caused by sharp objects.
Optimization and Control of Width Change Process
METHODS OF REDUCING CROP LOSSES
Crop losses after edging can be reduced by preventing the formation of non-rectangular shapes of the slab ends known as fish tail or tongue. Some of the methods that have been proposed and successfully implemented to solve this problem are as follows:
Utilization of convex crown slabs - According to this method, the convex crown slabs are produced with a continuous caster. When these slabs are rolled with horizontal flat rolls, the effect of slab center elongation is achieved thus reducing the fish tail.
Rolling with lubrication - In this method, lubrication is provided during edging with grooved rolls. Since the roll lubrication decreases the coefficient of friction in the roll bite, the growth of the dog bone becomes smaller.
Back-pressure slab rolling - In this method, edging is produced by pushing the slab into a vertical edger from the back. The pushing can be accomplished either by a pushing device or by a horizontal mill.
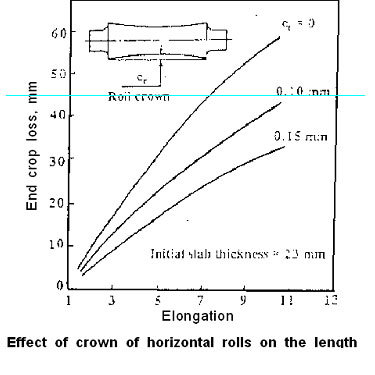
Convex crown rolling - According to this method, prior to edging, a convex cross-sectional profile of the slab is made by rolling between horizontal concave rolls. The effect of convex crown rolling on crop losses was investigated by Chong, et al. The convex crown on the slabs was obtained by rolling between horizontal rolls that have a concave crown.
To quantify the influence of the roll concave crown on end crop losses, experimental trials were completed using flat rolls with a concave crown of 0.1 and 0.15 mm over a 200 mm roll face length. During these tests, plasticine slabs of the same initial dimensions were rolled to a final thickness of approximately 2.5 mm. After 10 passes of rolling, the thickness had been reduced from a nominal 23 mm to 4.5 mm. It was shown that the rolled slab crown had a major influence on the plan view. As shown in Fig. 1, by using a roll crown of 0.15 mm, the end crop losses were reduced by 50% in comparison with the case when flat rolls were used.
Utilization of variable groove size rolls - Edging efficiency can be substantially improved with the use of grooved rolls. The application of this method, however, is limited to the cases when the slab thickness is compatible with the groove size. Indeed, once the slab thickness becomes thinner than the groove height, the bulge formation will no longer be restrained by the collars of the edging rolls and the resulting slab cross-section will be similar to that obtained with flat edging rolls. This problem can be solved by the use of edging rolls with a variable groove size.
Pre-forming slab ends - This method squeezes the slab end corners prior to edging by rolling. Pre-forming of the slab ends can be accomplished with the following methods:
- Flame cutting.
- Roll edging.
- Pressing.
Pre-forming of the slab ends by flame cutting results in substantial yield losses. Roll edging of the slab ends was found to be effective only for pre-forming of the tail end of the slab whereas pre-forming by pressing was found to be effective for both head and tail ends of the slab.
Pre-forming Slab Ends by Pressing
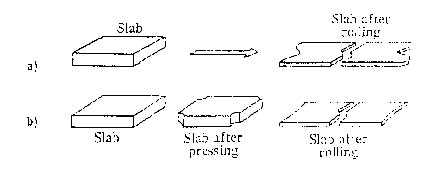
Figure 2 illustrates schematically the effect of pre-forming the slab ends using an edging press that was developed by IHI, Japan. This edging press squeezes the slab head and tail corners prior to edge rolling. The slab yield improvement produced by this method is claimed to be as much as 30% in comparison with conventional edge rolling.
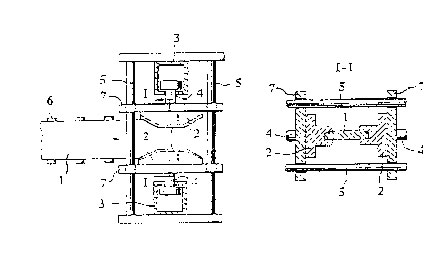
Fig. 2 Plan view of plate produced by: (a) conventional rolling, and (b) pre-forming slab ends by pressing.
A simplified drawing of the pre-forming press developed by Hitachi, Japan is shown in Fig. 3. This press comprises a pair of press tools 2. The center portion of the tool is flat and parallel to the slab edge while its end portions are tapered. The press tools 2 move reciprocatively in the widthwise direction with their movement being guided by the guiding rods 5 and guiding plates 7. This movement is provided by the hydraulic cylinders 3 with thepiston rods 4. The slab 1 is transferred towards the press by the table rolls 6 and is positioned between the press tools 2. The press tools have grooves to prevent slab buckling and to move the peak of bulging toward the slab center.
The efficiency of pre-forming the slab ends by pressing can be improved by selecting the optimum values for the pre-forming length L and press tool taper angle j0. An investigation conducted by Miyake, et al with a plasticine model (scale 1/15), shows that the crop losses decrease exponentially with an increase in the pre-forming length L as depicted in Fig. 4.
METHODS OF PREVENTING OUT-OF-SQUARE SLAB CROSS-SECTION
Several methods were proposed to reduce distortion of the slab cross-sectional profile.
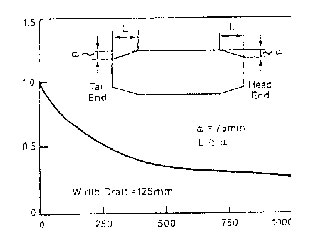
Fig. 3 Schematic presentation of Hitachi slab pre-forming press.
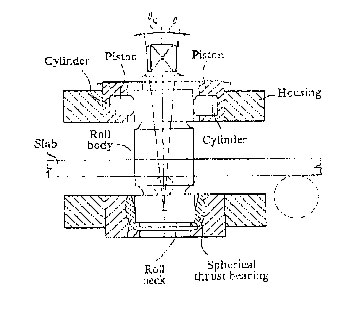
Fig. 4 Relationship between slab pre-forming length and crop area ratio.
Preventing out-of-square slab cross-section - The main cause of an out-of-square slab cross-section is the ascension of one side of the slab. This is generally prevented by using either grooved rolls or tapered rolls with a bottom collar.
Another method was recently proposed by Kokubo et al and is illustrated schematically in Fig. 5. When the axes of both edging rolls are perpendicular to the advancing direction of the slab, the slab tends to ascend on one side becoming tilted. To prevent this ascension, the edging roll at this side is tilted at the angle q toward the same direction as the advancing direction of the slab. For a reversing pass, the edging roll is tilted at the angel q0. This action creates a component of the roll tangential force that pushes the slab down against the table rolls.
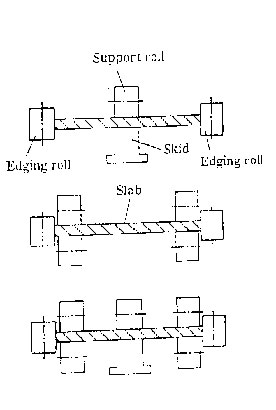
Fig. 5 Simplified presentation of tilted edging roll arrangement.
Preventing Slab Buckling - Excessive width reduction may lead to buckling of the slab which can usually be avoided by limiting the maximum allowable value of the edge draft. This value, however, can be increased with the use of support rolls and skids. The three buckling prevention systems shown in Fig. 6 are:
- Centre support.
- Both ends support.
- Three points support.
The three points support system was developed by Kawasaki Steel and IHI, both of Japan in application to plate rolling. In this system, the support rolls at the end are also capable of suppressing the formation of a dog bone.
Preventing Slab Edge Overlap - Slab edge overlap can be prevented by the application of V rolls as proposed by Kawasaki Steel and IHI, both of Japan. Each V roll has a flat portion and a grooved portion that can be selected by a simultaneous vertical shifting of both V rolls according to the rolling condition. The grooved portion of these rolls can be used for chamfer rolling, thereby preventing edge overlap.
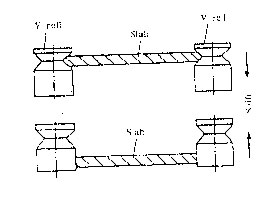
Fig. 6 Slab buckling preventing systems with : (a) centre support, (b) both ends support, and (c) three points support.
SELECTION OF OPTIMUM WIDTH CHANGE TECHNOLOGY
To determine the optimum width change technology for a hot strip mill, the technology must provide the following features:
- Desired width change capability at an adequate production rate.
- Minimum yield losses.
- Minimum capital investment.
- Minimum operating and maintenance cost.
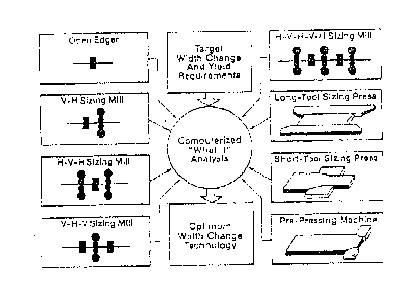
Fig. 7 Prevention of edge overlap with V roll.
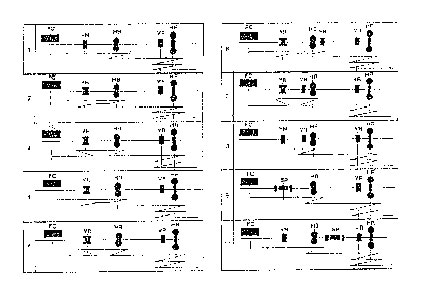
Fig. 8 Selection of optimum width change technology.
The desired width change range in a hot strip mill is usually determined in relation to the production rate and width change capability of a continuous caster. Therefore, the production rates of both systems are closely balanced. As the overall production rate becomes greater, it is usually preferred to have a lesser number of width changes made by the continuous caster, thereby, leaving the major burden of width changes to be made at the hot strip mill.
Once the desired width change range in a hot strip mill is selected, a comparative analysis should be performed in order to select the optimum width change technology (Fig. 8). As an example, Fig. 9 illustrates schematically ten various mill arrangements and pass schedules that were used in the width change technology comparative analysis for a 56 in. semi-continuous hot strip mill. The main purpose of this analysis, which was sponsored by Warren Consolidated Industries (WCI Steel), was to define the optimum modernization program for the existing roughing train so that it could achieve a width reduction capability of up to 6 inches.
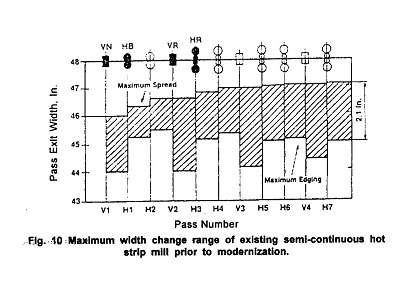
Fig. 9 Mill arrangements and pass schedules used in width change technology analysis for semi-continuous hot strip mill.
Arrangement 1 in Fig. 9 illustrates the existing roughing train that contains the following equipment:
- Nonreversing vertical mill with flat rolls VN
- Back-pass 2-heigh horizontal mill HB
- Attached reversing vertical mill VR
- Reversing 4-high horizontal mill HR.
Figure 10 shows the maximum width change range of existing semi-continuous hot strip mill prior to modernization. The mill configurations that were investigated for the optimization study incorporate the following main features:
- Replacement of the nonreversing vertical mill with flat rolls VN with a reversing vertical mill with grooved rolls VR (Arrangements 2-7).
- Replacement of the back-pass horizontal mill HB with a reversing horizontal mill HR (Arrangements 4, 5, 7, and 8).
- Addition of a reversing vertical mill VR either after the back-pass horizontal mill HB (Arrangement 6) or before a reversing horizontal mill HR (Arrangements 7 and 8).
- Installation of a sizing press SP either instead of the existing nonreversing edger VN (Arrangement 9) or after the existing back-pass horizontal mill HB (Arrangement 10).
WIDTH MEASURING SYSTEMS
Width measuring systems can be divided into the following two principal groups:
Non-contact width measuring systems usually incorporate an optical device that senses the width of the rolled product by scanning either its plan view with vertical optical beams or its edges with horizontal optical beams. The device that uses vertical beams, operates on the principle that the position of the slab edge may be optically located by virtue of the light contrast that occurs between the slab and its background. During measurement, the slab image is detected by a light sensitive transducer which transmits information to the measuring electronics.
Contact width measuring systems are based on the application of physical contact between the measured workpiece and a transducer which converts the measured width into another physical parameter that is usually an electrical signal.
The optical dimensional measurements can be accomplished by the following methods:
- Comparison method.
- Survey method.
- Combined method.
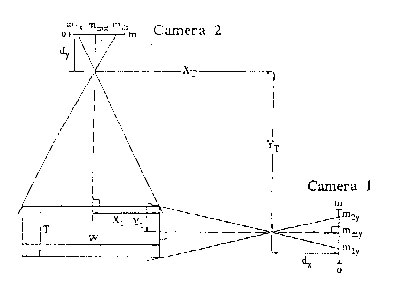
Comparison Method of Width Measurement - A width measuring system based on the comparison method evaluates the image of an object that is projected by an optical system of known magnification onto a graduated standard. With a known focal length of the camera lens and distance between the object and camera, the dimensions of the image can be related to the real size of the object.
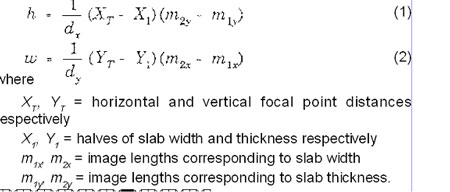
The comparison method is used in the slab width and thickness measuring system that was developed by Broken Hill Proprietary Co. (BHP), Australia. Figure 11. illustrates the geometry of the slab width and thickness measurement that was utilized in this two camera system. The measured slab width w and thickness h can be given by the following equations:
Survey Method of Width Measurement - The survey method of width measurement is based on the measurement of the angle subtended by an object's boundaries and the calculation of the object's dimensions by triangulation. This method is employed in the UPL-Scanex system, which incorporates a flying image technique. In this system, as shown in Fig. 12, the image of the product to be measured is scanned across a detector that produces a scan signal which is a variation of voltage with time. After further processing, the scan signal is converted into a square pulse that is proportional to the product dimension. To reduce distance errors, two cameras are used to set the nominal width of the material, one for each edge of the material being measured. The deviations of the material width from the set nominal width are detected with the scanning cameras.
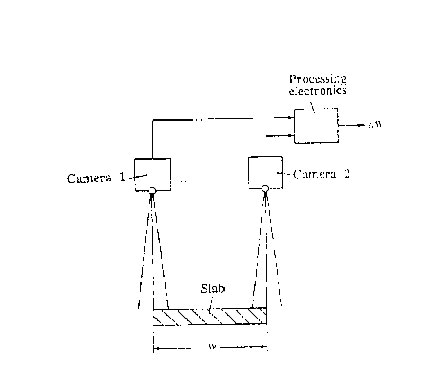
Fig. 11 Comparison method of width and thickness measurement utilized in BHP system.
Combined Method of Width Measurement - The main disadvantage of both the comparison and survey methods of width measurement is that with a tilted workpiece, the optical system sees only its projection onto a plane that is normal to the optical axis. Therefore, that projection no longer indicates the correct workpiece width. Thus, errors are caused because the optical system is unable to discover the position of the object in space.
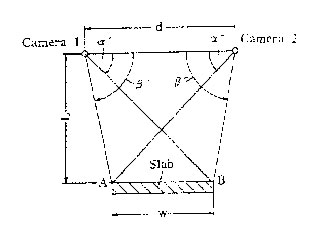
Fig. 12 UPL-Scanex system utilizing survey method of width measurement.
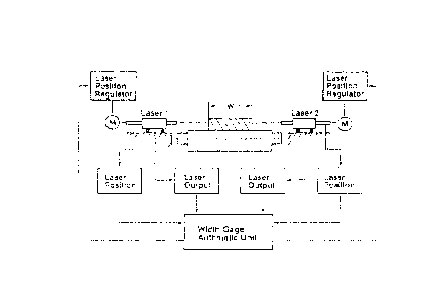
Fig. 13 Combined method of width measurement utilized in Accuband width gage.
To make the width measurement independent of the workpiece position, the combined method of width measurement utilizes the stereoscopic principle of measurement. This principle is employed in the Accuband width gage that was developed by George Kelk, Ltd., Canada. As shown in Fig. 13, the positions of A and B of each edge of the slab are detected with two cameras. Since the distance d between the cameras is fixed, the distance between the points A and B can be calculated by the triangulation method with the use of the measured values of the angles a', a", b', and b". At the height of the scanner unit, approximately 4.5 meters (14.8 ft) above the mill roller table, the accuracy of the Accuband gage in measuring the 2000 mm wide strip is reportedly ± 1 mm.
Width Gage with Horizontal Optical Beams - Figure 14 depicts a laser type width gage that was developed by Kawasaki Steel, Japan. In this gage, the optical beams are transmitted in a horizontal plane. A ray of helium-neon laser beam is cast onto the surface to be measured at an angle of incidence of approximately 2.5º. Light is reflected from this surface and is dispersed mainly in the direction of the angle of reflection equal to the angle of incidence.
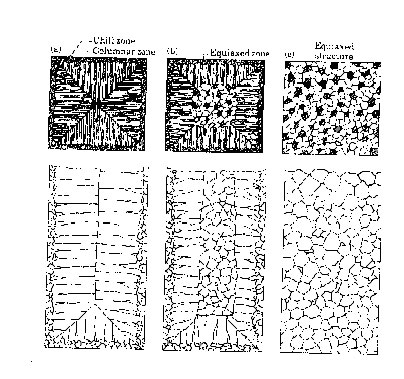
Fig. 14 Laser type width gage
Part of the reflected and dispersed light is received with a lens that projects an image of a bright spot generated on this surface onto a photo detector. If the surface to be measured shows a displacement, the image on the photo detector also moves and the output of the photo detector changes. As a results, an analog output that is proportional to this displacement is obtained from an arithmetic unit circuit.
This width gage consists of two displacement gages called laser 1 and laser 2. The position of these displacement gages is controlled with position sensors (Magnescales) that the based on the specified slab width so that the edges of the slab on the roller table are kept within the measuring range of the displacement gages. The slab width is determined from the displacement gage and position sensor output. Accuracy of ± 1 mm was reportedly obtained with this width gage.
Fundamentals of Metal Casting
INTRODUCTION
The casting process basically involves pouring molten metal into a mold patterned after the part to be manufactured, allowing it to cool, and removing the metal from the mold. As with all other manufacturing processes, certain fundamental relationships are essential to the production of good quality and economical castings. Knowledge of these relationships helps us establish proper techniques for mold design and casting practice. Our objective is to produce castings that are free from defects and that meet such requirements as strength, dimensional accuracy, and surface finish.
The important factors in casting operations are:
- The flow of the molten metal into the mold cavity.
- Heat transfer during solidification and cooling of the metal in the mold.
- Influence of the type of mold material.
- Solidification of the metal from its molten state.
Note the similarities between metal casting and pouring cake batter into a mold (pan) and baking it. We first select the kind and size of mold to use, control the composition of the mix, carefully pour the batter into the mold, set the proper baking temperature, set the timer for the proper baking time, and leave the baked cake in the mold a certain amount of time before we remove it.
SOLIDIFICATION OF METALS
After molten metal is poured into a mold, a series of events takes place during solidification of the casting and its cooling to ambient temperature. These events greatly influence the size, shape, uniformity, and chemical composition of the grains formed throughout the casting, which in turn influence its overall properties. The significant factors affecting these events are the type of metal, thermal properties of both the metal and mold, the geometric relationship between volume and surface area of the casting, and the shape of the mold.
1 Pure metals
Because a pure metal has a clearly defined melting or freezing point, it solidifies at a constant temperature. Pure aluminum, for example, solidifies at 660 oC (1220 oF), iron at 1573oC (2798 oF), and tungsten at 3410 oC (6170 oF).
When the temperature of the molten metal is reduced to its freezing point, its temperature remains constant while the latent heat of fusion is given off. The solidification front (solid-liquid interface) moves through the molten metal, solidifying from the mold walls in toward the center. Once solidification has taken place at any point, cooling resumes. The solidified metal, which we now call the casting, is then taken out of the mold and begins to cool to ambient temperature.
The grain structure of a pure metal cast in a square mold is shown in Fig. 1a. At the mold walls, the metal cools rapidly since the walls are at ambient temperature. Rapid cooling produces a solidified skin, or shell, of fine equiaxed grains. The grains grow in the direction opposite to the heat transfer out through the mold. Those grains that have favorable orientation will grow preferentially and are called columnar grains. As the driving force of the heat transfer is reduced away from the mold walls, the grains become equiaxed and coarse. Those grains that have substantially different orientations are blocked from further growth. Such grain development is known as homogeneous nucleation, meaning that the grains (crystals) grow upon themselves, starting at the mold wall.
2 Alloys
Solidification in alloys being when the temperature drops below the liquidus, TL, and is complete when it reaches the solidus, TS. Within this temperature range, the alloy is in a mushy or pasty state with columnar dendrites (from the Greek dendron meaning akin to, and drys meaning tree). Note the presence of liquid metal between the dendrite arms. Dendrites have three-dimensional arms and branches (secondary arms) and they eventually interlock, as shown in Fig 4. The study of dendritic structures, although complex, is important because of detrimental factors, such as compositional variations, segregation, and microporosity, that generally exist within a casting.
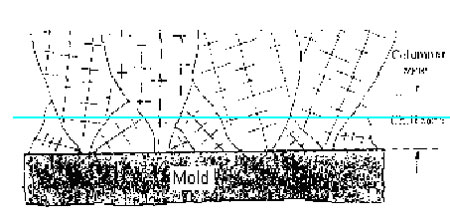
Figure 1. Schematic illustration of three cast structures of metals solidified in a square mold: (a) pure metals; (b) solid-solution alloys; and (c) structure obtained by using nucleating agents.
The width of the mushy zone, where both liquid and solid phases are present, is an important factor during solidification. We describe this zone in terms of a temperature difference, known as the freezing range, as follows:
Freezing range = TL - TS. (1)
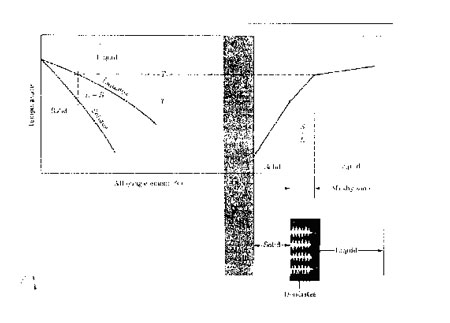
Figure 2. Development of a preferred texture at a cool mold wall. Note that only favorably oriented grains grow away from the surface of the mold.
In Fig. 3, you see that pure metals have a freezing range that approaches zero and that the solidification front moves as a plane front, without forming a mushy zone. Eutectics solidify in a similar manner with an approximately plane front. The type of solidification structure developed depends on the composition of the eutectic. For alloys with a nearly symmetrical phase diagram, the structure is generally lamellar with two or more solid phases present, depending on the alloy system. When the volume fraction of the minor phase of the alloy is less than about 25 percent, the structure generally becomes fibrous. These conditions are particularly important for cast irons.
For alloys, although it is not precise, a short freezing range generally involves a temperature difference of less than 50oC (90 °F), and a long freezing range greater than 110°C (200oF). Ferrous castings generally have narrow mushy zones, whereas aluminum and magnesium alloys have wide mushy zones. Consequently, these alloys are in a mushy state throughout most of the solidification process.
Effects of cooling rates. Slow cooling rates-on the order of 102 K/s-or long local solidification times result in coarse dendritic structures with large spacing between the dendrite arms. For faster cooling rates-on the order of 104 K/s-or short local solidification times, the structure becomes finer with smaller dendrite arm spacing. For still faster cooling rates-on the order of 106 to 108 K/s-the structures developed are amorphous. The structures developed and the resulting grain size, in turn, influence the properties of the casting. As grain size decreases, (a) the strength and ductility of the cast alloy increase, (b) microporosity (interdendritic shrinkage voids) in the casting decreases, and (c) the tendency for the casting to crack (hot tearing) during solidification decreases. Lack of uniformity in grain size and distribution results in castings with anisotropic properties.
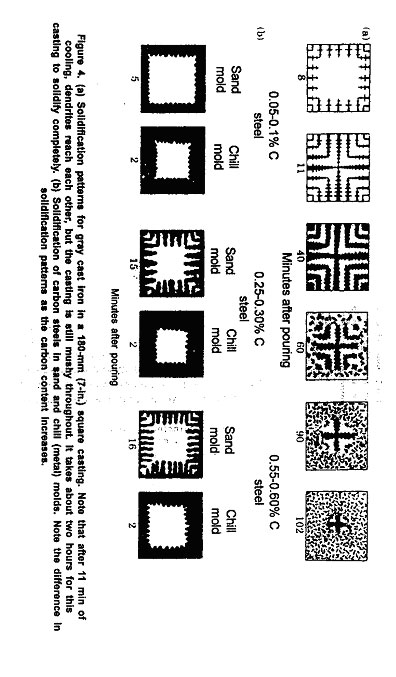
Figure 3. Schematic illustration of alloy solidification and temperature distribution in the solidifying metal. Note the formation of dendrites in the mushy zone.
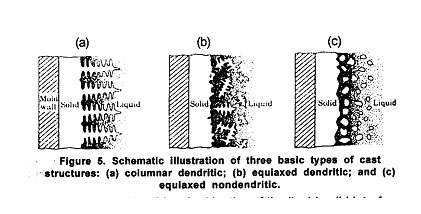
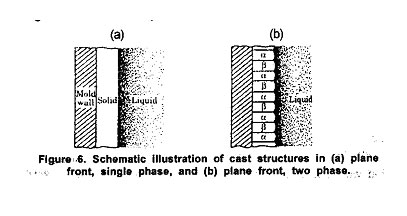
A criterion describing the kinetics of the liquid-solid interface is the ratio G/R, where G is the thermal gradient and R is the rate at which the liquid-solid interface moves. Typical values for G range from 102 to 103 K/m and for R from 10-3 to 10-4 m/s. Dendritic type structures, shown in Figs. 5a and b, typically have a G/R ratio in the range of 105 to 107, whereas ratios of 1010 to 1012 produce a plane-front, nondendritic liquid-solid interface.
STRUCTURE-PROPERTY RELATIONSHIPS
Because all castings are expected to possess certain properties to meet design and service requirements, the relationships between these properties and the structures developed during solidification are important aspects of casting. In this section, we describe these relationships in terms of dendrite morphology and the concentration of alloying elements in various regions.
The compositions of dendrites and the liquid metal are given by the phase diagram of the particular alloy. When the alloy is cooled very slowly, each dendrite develops a uniform composition. Under normal cooling encountered in practice, however, cored dendrites are formed and have a surface composition different from that at their centers (concentration gradient). The surface has a higher concentration of alloying elements than at the core of the dendrite owing to solute rejection from the core toward the surface during solidification of the dendrite, which is called microsegregation. The darker shading in the interdendritic liquid near the dendrite roots in Fig. 5 indicates that these regions have a higher solute concentration. Thus microsegregation in these regions is much more pronounced than in others.
There are many types of segregation. In contrast to microsegregation, macrosegregation involves differences in composition throughout the casting itself. In situations where the solidifying front moves away from the surface of a casting as a plane front, lower melting point constituents in the solidifying alloy are driven toward the center (normal segregation). Consequently, such a casting has a higher concentration of alloying elements at its center that at its surfaces. In dendritic structures such as those for solid-solution alloys, the opposite occurs: The center of the casting has a lower concentration of alloying elements (inverse segregation). The reason is that liquid metal (having a higher concentration of alloying elements) enters the cavities developed from solidification shrinkage in the dendrite arms, which have solidified sooner. Another form of segregation is the result of gravity (gravity segregation), whereby higher-density inclusions or compounds sink, and lighter elements (such as antimony in an antimony-lead alloy) float to the surface.
A typical cast structure of a solid-solution alloy with an inner zone of equiaxed grains is shown in Fig. 1b. This inner zone can be extended throughout the casting, as shown in Fig. 1c, by adding an inoculant (nucleating agent) to the alloy. The inoculant induces nucleation of grains throughout the liquid metal (heterogeneous nucleation).
Because of the presence of thermal gradients in a solidifying mass of liquid metal and because of gravity (hence density differences), convection has a strong influence on the structures developed. Convection promotes the formation of an outer chill zone, refines grain size, and accelerates the transition from columnar to equiaxed grains. The structure shown in Fig. 5b can also be obtained by increasing convection within the liquid metal, whereby dendrite arms separate (dendrite multiplication). Conversely, reducing or eliminating convection results in coarser and longer columnar dendritic grains. The dendrite arms are not particularly strong, and they can be broken up by agitation or mechanical vibration in the early stages of solidification. This results in finer grain size, with equiaxed nondendritic grains distributed more uniformly throughout the casting. Convection can be enhanced by the use of mechanical or electromagnetic methods.
Experiments are now being conducted during space flights concerning the effects of gravity on the microstructure of castings. Lack of gravity or microgravity, as it is now called in regard to space travel, means that unlike on Earth, there are no significant density differences or thermal gradients (hence no convection) during solidification, thus affecting solidification structure and distribution of impurities. Recent experiments involve crystal growing to produce cadmium-zinc telluride, mercury-zinc telluride, and selenium-doped gallium arsenide semiconductor samples.
Plate Mills
Introduction
Although one of the oldest types of hot mills, presently accounting for approximately 8 per cent of steel shipments, plate mills have seen significant developments in recent years. They have undergone a series of evolutions, passing from the outmoded universal mill, to the two-high, single-stand sheared plate mill, to the three-high mill and lastly to the modern four-high configuration. Modern single-stand plate mills now utilize larger housings, larger roll sizes and more driven power than any other type of mill stand. Typical of this trend is the plate mill installed at Dillingen, West Germany, which features rolls 1120 mm and 2150 mm by 4300 mm driven by two twin motors rated at 12,000 hp each and capable of delivering a torque of 130 tonne-meters.
These improved mills with their greater rigidity produce plates of more uniform thickness and superior flatness under both normal and controlled rolling conditions. In the latter case, higher rolling forces and greater drive powers are required. Their performance is facilitated by modern instrumentation, automatic-gage-control (AGC) systems and computer control. Wedge-shaped plates (with the gage changing uniformly in the rolling direction) can now be produced for use in shipbuilding and for other purposes. Improved yields are also being obtained by rolling workpiece with ends that are slightly thickened in both the earlier normal and broadside passes.
Finishing operations, such as the cutting of plates to size, their inspection, and marking, are computer-controlled in the most recent plate-mill installations in Japan. Consideration is also being given to the in-line quenching and heat-treatment of plates following the last rolling pass as a means of conserving energy.
TYPES OF MILLS USED FOR THE ROLLING OF PLATES
During the last 200 years, various types of mills have been employed to roll plates. Two-high pull-over mills were used during the first half of the nineteenth century and three-high and reversing mills during the latter half of the same century. The universal mill, invented in 1848, was used soon thereafter in Pittsburgh, Pennsylvania, to roll plates 7 to 24 inches wide in thicknesses ranging from 3/16 to 2 inches.
As late as 1920, plates were being rolled on two-high reversing mills consisting of a train of two stands of plain rolls. In these mills, the roughing stand nearer the steam engine was driven through both rolls whereas the finishing stand was driven only through the bottom roll. In many cases, especially in England, the rolls were run hot, no attempt being made to cool them. Two-high nonreversing mills are now obsolete for producing finished plate but two-high mills are still used as scale-breakers and roughers, in tandem with finishing unit which is either a three-high or four-high mill.
A wide variety of tandem plate-mill layouts exist because such arrangements often represent modifications to original rather than new installations. Such facilities may be categorized as semi-continuous and continuous, the former utilizing multipass reversing roughing units whereas the latter use nonreversing roughing units coupled with two or more single-pass stands in which the plate is reduced simultaneously. Two-, three- and four-high stands with or without scalebreakers, broadside stands, squeezers and edgers are used as roughing stands while four-high mills are used as finishing units.
The use of a light vertical stand for edging purposes was widespread during the 1950 to 1965 period. However, due to economic reasons, this practice is not incorporated in the newer mills, but plate mills built for the rolling of heavy ingots still utilize edgers.
PLATE-MILL DESIGN
Whereas early plate mills often rolled small ingots into plates (direct rolling), modern plate mills generally utilize reheated, conditioned slabs. The latter approach permits the attainment of better surface quality in the rolled product, better mechanical properties in the plate through higher reduction ratios between initial and final thicknesses, improved temperature control in the rolling operation and greater output because of fewer passes. Direct rolling from ingots is generally carried out only in special cases as, for example, in the rolling of very large plates (although modern slabbing mills can now handle ingots weighing up to 40 tons).
Many plate mills are now rolling, or will be rolling in the near future, continuously cast slabs, where a reduction ratio of four or five to one is required. Thus, when continuously cast slabs up to 10 or 12 inches thick are available, the entire thickness range of plates (up to 3 inches) can be obtained. However, to ensure maximum mill productivity, the slab thickness should be directly proportional to plate thickness. For this reason, continuous casters may have to be capable of convenient adjustment of slab thickness as, for example, by the use of in-line reduction stands.
To reheat the conditioned slabs, the most modern conventional or walking beam furnaces are now used. Such furnaces are not only thermally efficient, but provide a high degree of temperature uniformity in the heated slabs. They should have a maximum capacity about 50 per cent greater than the average output of the plate mill.
Modern plate mills are capable of rolling product at least 100 inches wide and often up to 200 inches in width. In some cases, plates are rolled double-width and later cut to ordered width. Typically, both roughing and finishing stands are utilized.
Whereas scalebreaking stands are often incorporated in the older plate mills, mills built after 1966 have no ©special horizontal or vertical descaling stands. This has resulted from the successful use of high-pressure water sprays to remove both primary and secondary scale. Sometimes, to maintain constant spacing from the top surface of the workpiece, the spray headers are attached to the top work- or top backup-roll chocks. On the roughing stands, they are often located on each side of the stand and, on the finishing stands, they are placed only on the entry side. In order to avoid excessive plate cooling, some mills utilize steam descaling.
Since an increasing fraction of plate output is now controlled-rolled. Some two-stand mills feature a bypass cooling bed connected to the mill tables by two transfers. In such cases, the workpiece may be moved backwards and forwards to prevent localized cooling by the table rolls.
To achieve the desired stiffness, modern mills use backup rolls of large diameter (often in excess of 80 inches) and housing posts of large cross-sectional area (often in excess of 1500 square inches). The weights of the mill housings often exceed 250 tons and mill moduli of the order of 56 million pounds per inch are attainable. Specific rolling forces in the range of 60,000 to 120,000 pounds per inch are generally achievable and thinner plates (down to about 1.12 inches in thickness) may be conveniently rolled.
Work-roll diameters are established by the maximum torque required to transmit the deformation energy to the workpiece. Mills over 160 inches in width are designed for pull-out torques of over 50 million pound-inches and use work rolls 40 to 44 inches in diameter. Generally, the ratio of pull-out torque to roll-body length is 250,000 to 350,000 pound-inches per inch.
Since designed mill speeds are usually in the range of 1000 to 1200 fpm, the high spindle-torque requirements necessitate the use of very large drive powers (up to 24,000 hp).
Many of the new mills incorporate two roll-positioning systems. A high-speed screwdown system (maximum speed 3 to 6 fpm) is utilized for adjusting the roll gap between passes and low-speed, high-accuracy system (maximum speed 3 to 6 ipm) is used for adjusting the rolls to a positional accuracy of one mil under load for the purpose of automatic gage control. Where a mill may be used either as a blooming mill or a plate mill, separate drives may be utilized with the screwdown system. The very latest plate mills incorporate hydraulic roll positioning mechanisms and, for the control of plate profile and flatness, work-roll and/or backup-roll bending systems are utilized.
Computers are now generally used for the control of new plate mills, as exemplified by the two-stand 157/124-inch mill at the Hoesch Dortmund Works. The computer control of this mill ensures 1) thickness uniformity and flatness of the plate, 2) a high degree of width uniformity and decreased edge scrap through width control of the roughing stand, 3) increased output through material tracking, process control and the optimum balance of the passes between the two stands and 4) a decreased number of rolling passes. To be able to perform these functions, the computer receives signals from 41 photocells mounted along the roller tables (indicating the position of each workpiece) and noncontacting measuring devices for monitoring workpiece temperature, thickness, width and length, as well as the rolling force and spindle torques.
An important consideration in the operation of plate mills is the handling of scale removed from the slab surfaces. In some cases, the scale-removal system is built under the tables and mill stands as part of the foundation. It consists basically of a trench through which water flows from one end to the other, the scale being removed by a bucket-type drag operating in the opposite direction, deposited through a coarse screen into a vibrating feeder which, in turn, deposits it on to a belt conveyor for transfer either to a hopper or a scale car. The effluent is normally pumped to a lagoon where much of the remaining scale settles out and the tramp oils may be skimmed off.
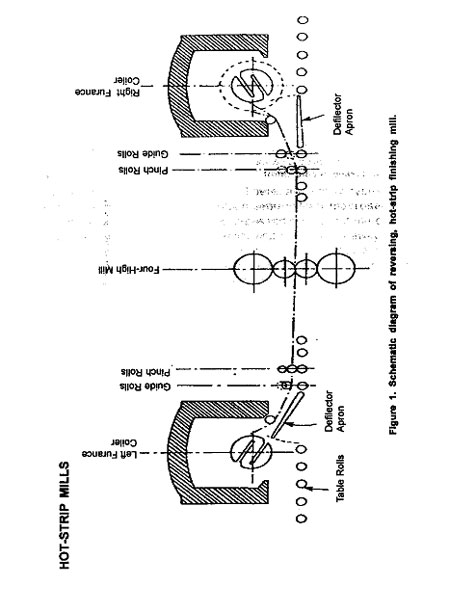
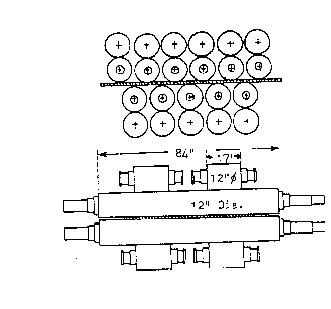
Fig. 1. Arrangement of rolls in hot leveller (Work rolls are water-cooled.)
The productivities of the newest plate mills are high, the more efficient being capable of rolling about 2 million tons per year.
THE LEVELLING OF PLATES
To ensure that plates are at a sufficiently low temperature before being levelled, some mills utilize spray-cooling systems on the mill run-out table. By cooling heavy-gage plates with such a system, the plate will retain the flatness imparted by the leveller and its surface hardness will be increased, thereby minimizing scratching during later operations.
To impart the desired flatness to the lighter gages of rolled product (generally up to about 2 inches in thickness), levellers are employed, usually at a distance of about 250 feet from the finishing stand. They are generally of the same basic design, utilizing a number of rollers, sometimes these being backed up by additional rolls. One arrangement is shown in Figure 1. This is a 6-over-5 backed-up unit with 12-inch diameter work rolls supported by 12-inch diameter backup rolls. The work rolls are commonly internally water-cooled with the entire assembly being equipped with external water-flushing and air-blow-off systems to ensure proper scale removal from the rolls. The unit shown in Figure 1. is driven by two 200-hp d-c motors at speeds up to 335 fpm.
Driven feed rolls are usually located before and after the leveller. These rolls are generally slightly larger in diameter than the work rolls of the leveller, are internally cooled in some instances, and are adjusted so that the entry roll is set somewhat below and the exit roll somewhat above the top bank of rolls. In other installations, pinch rolls are used in conjunction with levellers.
Hot Strip Mills
INTRODUCTION
No type of mill has probably experienced more dramatic developments than the hot-strip mill during the 1950's and 1960's. Following the building of "Generation I" mills in the 1930's and the 1940's, the succeeding decades saw the introduction of "Generation II" mills of greater width and increased drive power, with tandem roughing stands, 7-stand finishing trains, improved automatic-gage-control systems, laminar-flow cooling on the runout tables, the use of hot-rolling lubricants and the practice of "zooming" or the gradual increase in rolling speed during the processing of a coil. The newer mills featured complete computer control of the reheat furnaces, the roughing and finishing stands and the cooling sprays on the runout table. Although capable of rolling strip down to a thickness close to 0.040 inches, economic reasons usually dictate minimum finish gages of about 0.075 inches or thicker. At the other end of the product-thickness range, strip about one inch thick is now rolled on hot-strip mills for spiral-pipe manufacture and other applications.
Still further innovations have characterized the few new "Generation III" mills installed during the 1970's. These have included improved instrumentation (including shape or flatness sensing), the computer control of the finishing train to provide the desired cross-sectional profile and flatness of the rolled strip and the Stelco coilbox installed between the last rougher and the finishing train (which coils the bar after roughing and minimizes the length requirement of the delay or crop-shear table). Moreover, consideration is being given to the use of reversible tandem roughing trains.
Unfortunately, however, the total costs of Generation II and Generation III hot-strip mills have been so large as to limit the number of installations in recent years and to encourage not only innovations with respect to conventional hot-strip mills but also a resurgence in the use of simpler, more economical mills, particularly for the rolling of specialty steels. The latter include the hot Steckel mill discussed in the next section and relatively new types of mills, such as planetary mills, as described later in this chapter.
STECKEL HOT MILLS
A sketch illustrating the general arrangement of a Steckel hot mill is shown in Figure 1. It consists of a single 4-high reversing mill stand with two coilers located above the passline and contained within furnaces. In some cases, a slab 3 to 5 inches thick is rolled back and forth in the mill until a thickness of about half an inch has been obtained. Then the workpiece is directed up to a furnace coiler and the temperature of the coil is maintained at about 1650° F for the successive passes. In other installations, a two-high roughing stand is used ahead of the Steckel mill to convert the small slabs to bars. After roughing, the bar passes through a tunnel-type furnace into the Steckel mill and thence to the coiler on the remote side of the mill. In the successive passes (usually four), the bar is reduced to hot-strip gage and is then transferred out to a conventional cooling table and coiler. Figure 2 shows the layout of a recent Steckel mill installation used primarily for rolling stainless steels. Note here the use of an induction furnace for heating the slabs.
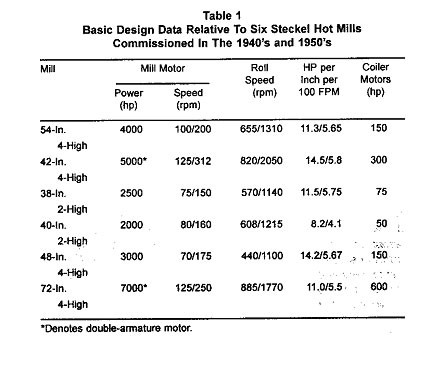
Basic design specifications for six Steckel hot mills commissioned in the late 1940's and early 1950's are presented in Table 1. Most hot mills of this type now have single-slot coilers requiring that the coiler from which the strip has just been unwound be reset with the slot in the proper position to receive the head end of the strip at the beginning of the next pass. In addition, the acceleration of the mandrel must be fast to avoid looping the strip.
Roll wear is more severe with this type of hot-strip mill than with semi-continuous and continuous hot-strip mills. However, this disadvantage can be alleviated considerably by the use of hot-rolling lubricants.
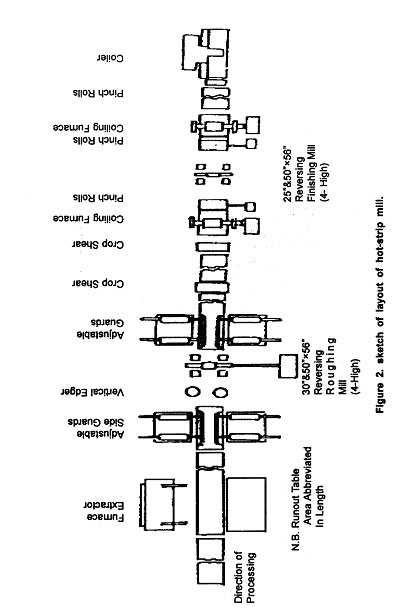
Steckel hot mills are capable of productivities ranging from 250,000 to over 1,000,000 tons per year. Only a limited number are now in operation throughout the world, since some of the earlier mills have been converted into semi-continuous facilities. They are principally used by small, independent producers hot rolling relatively small tonnages of stainless steel or other high-value slabs to strip.
PLANETARY MILLS
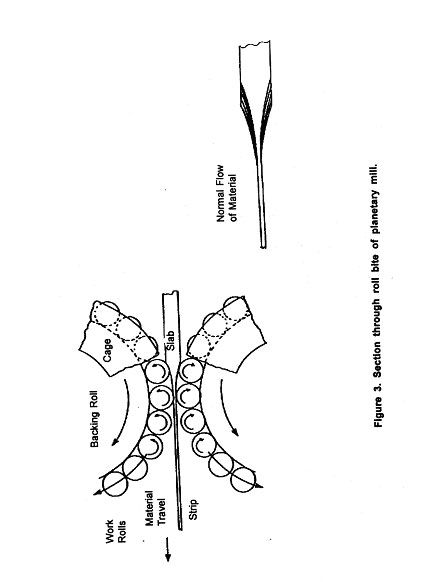
The basic principle of operation of a planetary mill is illustrated in Figure 3 and a typical mill layout, depicted in Figure 4, is seen to consist of feed rolls, the planetary roll clusters, a looping system and planishing rolls. The mill is basically a "once-through" type (nonreversing) and, together with the feed rolls, is capable of providing up to a 20:1 reduction ratio. However, for economic and metallurgical reasons, hot-strip mills should be capable of providing at least a 75:1 overall reduction ratio. Hence planetary mills must be supplemented with roughing and/or finishing stands.
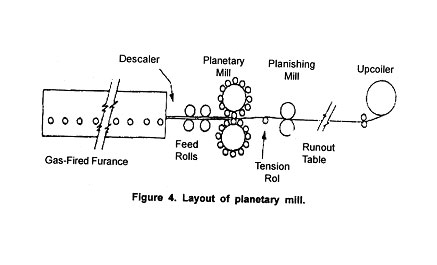

Because of the slow entry speed of the workpiece into a planetary mill, it is usually desirable to locate a roller-hearth furnace close to the mill. When the mill is used in conjunction with a continuous caster, the slabs are already hot and only require soaking. However, when the slabs are initially cold, the length of the furnace may be minimized by operating it at a higher-than-normal temperature.
Since planetary mills are not self-feeding, the slabs must be fed into the mill end-to-end in a continuous manner. When the end of the last slab has left the pinch rolls, the mill rolls must be rapidly opened, the strip cut on the exit side of the mill and the tail-end of the slab pulled backwards out of the mill by the feed rolls.
The action of the small planetary rolls is to produce a "washboard" type of surface on the strip. This surface characteristic must be removed by the use of a two-high or four-high planishing mill following the planetary mill. Where the latter type of planishing mill is used, an additional 30 per cent reduction may be given to the strip.
Basically, there are three types of planetary-mill installations, these being the Sendzimir planetary, the single planetary and the Krupp-Platzer planetary mills described in the succeeding sections.
Quality Assurance, Testing, and Inspection
INTRODUCTION
It has been noted that a manufactured product develops certain external and internal characteristics, which result in part from the production processes used. External characteristics involve surface finish and surface integrity, such as surface damage from cutting tools or friction during processing of the workpiece in dies. Internal characteristics include various defects, such as porosity, impurities, inclusions, phase transformations, embrittlement, cracks, debonding of laminations, and harmful residual stresses. Some of these defects may exist in the original stock, or they may be induced or introduced during the manufacturing operation.
Before they are marketed, manufactured parts and products are inspected for several characteristics. This inspection routine is particularly important for products or components whose failure or malfunction has potentially serious implications, such as bodily injury or fatality. Typical examples are cables breaking, switches malfunctioning, brakes failing, grinding wheels breaking, railroad wheels fracturing, turbine blades failing, pressure vessels bursting, and weld joints failing. This chapter identifies and describes the various methods that are commonly used to inspect manufactured products.
Product quality has always been one of the most important elements in manufacturing operations. In view of the present global economy and competition, continuous improvement in quality has become a major priority, particularly for major corporations in the U.S. as well as other industrialized countries. In Japan, for example, the single term kaizen is used, meaning never-ending improvement. This chapter describes in detail the important factors involved in continuous quality assurance of manufactured products.
Prevention of defects in products and on-line inspection are now major goals in all manufacturing activities. We again emphasize that quality must be built into a product and not merely checked after the product has been made. Thus close cooperation and communication between design and manufacturing engineers and direct involvement and encouragement from the management are essential. Important advances in quality engineering and productivity has been made, largely because of the efforts of quality experts such as Deming, Taguchi, and Juran. The importance of quality, reliability, and safety of products in a global economy is now being recognized internationally by the establishment of the ISO 9000 quality standard, and in the U.S. by the presentation of the Malcolm Baldrige National Quality Award.
Product Quality
We have all used terms like "poor quality" or "high quality" to describe a certain product, a certain store, or the products of a certain company. What is quality? Although we may know it when we see or use a product, quality, unlike most technical terms, is difficult to define precisely. Quality has been defined as (a) a product's fitness for use, and (b) the totality of features and characteristics that bear on a product's ability to satisfy a given need. More recently, several dimensions of quality have been identified, including the product's performance, features, conformance, durability, reliability, serviceability, aesthetics, and perceived quality.
Quality is a broadbased characteristic or property; and it not only consists of several well-defined technical considerations, but also can be quite subjective. A handle on a kitchen utensil that has been installed crooked, a product whole walls are so thin that it warps when subjected to small forces or temperature variations, and a machine tool that cannot maintain accuracy of the workpiece because of lack of stiffness or poor construction-all lead us to believe that the product is of low quality. A calculator or weighing scale that functions erratically and an arm rest on an automobile door that repeatedly comes loose are further examples of what we think of as low-quality products.
The public's perception is that a high-quality product is one that performs its functions reliably over a long period of time, without breaking down or requiring repairs. A few examples of this type of products are "good quality" refrigerators, washing machines, automobiles, bicycles, and kitchen knives. On the other hand, if the stem of a screwdriver bends, its handle discolors or cracks, or its tip wears off more rapidly than we had expected, we say that this screwdriver is of low quality.
Note that, in describing good- or poor-quality products, this text has not yet stated the lifetimes of products or any of their technical specifications. Throughout this text you have seen that design and manufacturing engineers have the freedom and responsibility to select and specify materials for the products to be made. Thus when selecting the metal for a screwdriver stem, you can specify materials that have high strength and high resistance to wear and corrosion. As a result, the screwdriver will perform better and last longer than one made of materials with inferior properties.
You must recognize, however, that materials possessing better properties also are generally more expensive and may be more difficult to process than those with poorer properties. Moreover, because the range of available materials and properties is so broad, manufacturers in the past have usually been forced to set some limit on expected useful product life. For example, automobile disk brakes under normal use are generally designed and manufactured to last an average of about 65,000 km (40,000 miles), mufflers 50,000 km (30,000 miles), batteries 4 years, and tires 65,000-100,000 km (40,000-60,000 miles). Similarly, a typical water heater for homes is expected to last about 10 years; a dollar bill, 18 months; hair dryer, five years; a vacuum cleaner, 10 years; central air conditioning, 15 years; and a nuclear reactor, 40 years.
The level of quality that a manufacturer chooses for its products may be market-dependent. For example, low-cost, low-quality tools have their own market niche. Even this sort of product, however, has its own degree of required quality performance. Quality standards are essentially trade-offs among several considerations. Thus the engineer has many opportunities to review and modify overall product design and manufacturing processes in order to minimize costs without sacrificing quality. Contrary to general public perception, quality products do not necessarily cost more. In fact, you will see that higher quality actually means lower cost when you consider that poor quality has significant built-in costs of customer dissatisfaction, difficulties in assembling and maintaining components, and need for in-field repair.
QUALITY ASSURANCE
Quality assurance is the total effort by a manufacturer to ensure that its products conform to a detailed set of specifications and standards. These standards cover several parameters, such as dimensions, surface finish, tolerances, composition, color, and mechanical, physical, and chemical properties. In addition, standards are usually written to ensure proper assembly using interchangeable, defect-free components and a product that performs as intended by its designers.
Quality assurance is the responsibility of everyone involved with design and manufacturing. The often-repeated statement that quality must be built into a product reflects this important concept. Although a finished product can be inspected for quality, quality cannot be inspected into a finished product. Although product quality has always been a crucial issue, increased domestic and global competition has caused quality assurance to become even more important. Every aspect of design and manufacturing operations, such as material selection, production, and assembly, is now being analyzed in detail to ensure that quality is truly built into the final product.
An important aspect of quality assurance is the capability to analyze defects and promptly eliminate them or reduce them to acceptable levels. In an even broader sense, quality assurance involves evaluating the product and customer satisfaction. The sum total of all these activities is referred to as total quality control (TQC), and in a larger sense, total quality management.
From the discussion so far, you should realize that in order to control quality you have to be able to (a) measure quantitatively the level of quality, and (b) identify all the material and process variables that can be controlled. The level of quality obtained during production can then be established by inspecting the product to determine whether it meets the specifications for tolerances, surface finish, defects, and other characteristics. The identification of material and process variables and their effect on product quality is now possible through the extensive knowledge gained from research and development activities in all aspects of manufacturing.
TOTAL QUALITY MANAGEMENT
The total quality management (TQM) concept is a management system emphasizing the fact that quality must be designed and built into a product. Defect prevention, rather than defect detection, is the major goal. Total quality management is a systems approach in that both management and workers make an integrated effort to manufacture high-quality products consistently. Leadership and teamwork in the organization are essential to ensure the never-ending goal of continuous improvement of all aspects of manufacturing operations, to reduce product variability, and to improve customer satisfaction. All tasks concerning quality improvements and responsibilities should be clearly identified. The TQM concept also requires you to control processes, and not the parts produced, so that no defective parts are allowed to continue through the production line.
A related concept is the quality circle. This activity consists of regular meetings by groups of workers who discuss how to improve and maintain product quality at all stages of the manufacturing process. Worker involvement and responsibility are emphasized. Comprehensive training is provided so that the worker can become capable of analyzing statistical data, identifying causes of poor quality, and taking immediate action to correct the situation. Putting this concept into practice recognizes the importance of quality assurance as a major company-wide management policy, affecting all personnel and all aspects of production.
In recognition of the importance of quality in manufacturing in the United States, the Malcolm Baldrige National Quality Award was established in 1998. Named after a former U.S. secretary of commerce, the purposes of this award are: (a) To promote awareness and understanding of the importance of quality improvement to the nation's economy, (b) to recognize companies for outstanding quality management and achievement, and (c) to share non-proprietary information on successful quality strategies. The award's main criteria concern two key competitiveness thrusts: delivery of ever-improving value to customers, and systematic and continued improvement of a company's overall operational performance.
Quality engineering as a philosophy
Many of the quality-control concepts and methods discussed thus far have been put into larger perspective by certain experts in quality control. Notable among these experts are Deming, Taguchi, and Juran, whose philosophies of quality and product cost have had a major impact on modern manufacturing. Their philosophies of quality engineering are outlined in this section.
Deming methods
During World War II, W.E. Deming and several others developed new methods of statistical process control in manufacturing plants for wartime industry. The need for statistical control arose from the recognition that there were variations in the performance of machines and people and the quality and dimensions of raw materials. Their efforts, however, involved not only statistical methods of analysis, but a new way of looking at manufacturing operations to improve quality and lower costs. Deming recognized that manufacturing organizations are systems of management, workers, machines, and products. His basic ideas are:
- Define management's commitment to product quality and productivity. Making profits is essential, but it is not the organization's only purpose. Emphasize the continuity and consistency of the organization's reason for being.
- Recognize that high quality does not necessarily mean high cost. Making a defect-free part actually costs less.
- Avoid traditional adversarial relationships between management and workers. Encourage open communication among all groups in the organization and problem solving through teamwork. Break down barriers in communication between various departments in the organization.
- Require that managers clearly identify those problems that are caused by the workers and those that are caused by the system. Make continued efforts to identify problems in the system and find ways to solve them.
- Recognize that workers know where potential improvements are possible. In addition to performing their jobs, workers are intelligent and capable of generating creative ideas and providing insight.
- Recognize pride of workmanship and provide the techniques and tools to enable workers to improve their performance. Avoid slogans, posters numerical goals, and production quotas.
- Do not allow commonly accepted levels of defective materials, delays, and defective parts. Reduce the number of suppliers and purchase materials on a statistical basis, not price.
- Use modern statistical methods and teach them to the workers to enable them to identify problems and improve quality and productivity.
- Institute training programs for advancing the education of employees, allowing them to keep abreast of new developments in materials, processes, and technologies.
Note that Deming places great emphasis on communication, direct worker involvement, and education in statistics and modern manufacturing technology. His ideas have been widely accepted in Japan since the end of World War II but only recently in some segments of the U.S. manufacturing community.
Taguchi methods
In the G. Taguchi methods, high quality and low costs are achieved by combining engineering and statistical methods to optimize product design and manufacturing processes. Loss of quality is defined as the financial loss to society after the product is shipped, with the following results:
- Poor quality leads to customer dissatisfaction.
- Costs are incurred in servicing and repairing defective products, some in the field.
- The manufacturer's credibility is diminished in the marketplace.
- The manufacturer eventually loses its share of the market.
The Taguchi methods of quality engineering emphasize the importance of:
- Enhancing cross-fuctional team interaction. In this interaction, design engineers and process or manufacturing engineers communicate with each other in a common language. They quantify the relationships between design requirements and the manufacturing process.
- Implementing experimental design, in which the factors involved in a process or operation and their interactions are studied simultaneously.
In experimental design, the effects of controllable and uncontrollable variables on the product are identified. This approach minimizes variations in product dimensions and properties, bringing the mean to the desired level. The methods used for experimental design are complex, involving the use of fractional factorial design and orthogonal arrays, which reduce the number of experiments required. These methods are also capable of identifying the effect on the product of variables that cannot be controlled (called noise), such as changes in environmental conditions.
The use of these methods allows rapid identification of the controlling variables and determination of the best method of process control. These variables are then controlled, without the need for costly new equipment or major modifications to existing equipment. For example, variables affecting tolerances in machining a particular component can be readily identified, and the correct cutting speed, cutting tool, and cutting fluids can be specified.
Juran methods
A contemporary of Deming, J.M. Juran emphasizes recognizing quality at all levels in an organization, including upper management; fostering a responsive corporate culture; and training all personnel in how to plan, control, and improve quality. The concern of the top management in an organization is with business and management, whereas those in quality control are concerned with technology. These different worlds are often at odds and lead to quality problems.
The planners determine who the customers are and what their needs are. An organization's customers may be external (the end users who purchase the product or service), or they may be internal (the different parts of an organization that rely on other parts of the organization to supply them with products and services). The planners then develop product and process designs to respond to the customer's needs. The plans are then turned over to those in charge of operations, who have the responsibility for quality control and continued improvement in quality.
The ISO 9000 standard
With increasing international trade, global manufacturing, and price-sensitive competition, a wide choice of industrial and consumer products are now becoming available. Also, customers are increasingly demanding high-quality products and services at low prices, and are looking for suppliers that can respond to this demand consistently and reliably. This strong trend, in turn, has created the need for international conformity and consensus regarding the establishment of quality control methods and reliability and safety of the products made in different countries and traded internationally.
First issued in 1987 (with a 1994 revision), the ISO 9000 standard (Quality Management and Quality Assurance Standards) is a deliberately generic series of quality-system management standards. By 1993, more than 50 countries (industrial as well as developing) had already adopted it as a national industry standard. It has permanently influenced the way manufacturing companies conduct business in world trade and is rapidly becoming the world standard for quality. The ISO 9000 series includes the following standards:
- ISO 9001: Quality systems - Model for quality assurance in design/development, production, installation, and servicing.
- ISO 9002: Quality systems - Model for quality assurance in production and installation.
- ISO 9003: Quality systems - Model for quality assurance in final inspection and test.
- ISO 9004: Quality management and quality system elements - Guidelines
Companies voluntarily register for these standards and are issued certificates. As of 1994, registration may be sought generally for ISO 9001 or 9002, although some companies have registration to ISO 9003. The 9004 standard is simply a guideline and not a model or basis for registration. For certification, a company's plants are visited and audited by accredited and independent third-party teams to certify that the standard's 20 key elements are in place and functioning properly. Depending on the extent to which a company does not meet the requirements of the standard, registration may or may not be recommended at that time. The audit team does not advise or consult with the company on how to fix discrepancies, but merely describes the nature of the noncompliance. Periodic audits are required to maintain certification. The certification process can take from six months to a year or more, can cost tens of thousands of dollars, depending on the size, number of plants and product line of the company.
The ISO 9000 standard is not a product certification but a quality process certification. Although the 1987 standard makes no reference to continuous quality improvement, the 1994 revision has a section on quality planning and implicitly addresses the need for improvement. Companies establish their own criteria and practices for quality. However, the documented quality system must be in compliance with the ISO 9000 standard; thus a company cannot write into the system any criteria which opposes the intent of the standard.
Registration means conformity to consistent practices, as specified by the company's own quality system (such as quality in design, development, production, installation, and servicing), including proper documentation of such practice. Thus customers, including government agencies, are assured that specified practices are being followed by the supplier of the product or service (which may or may not be within the same country). In fact, manufacturing companies are themselves assured of such practice regarding their own suppliers who have ISO 9000 registration; they may even demand that their suppliers be registered.